dh-NOISE — AUv3 Plugin
dh-NOISE runs as an AUv3 instrument plugin inside a compatible host application. Import audio samples, slice them into individual playable regions, then trigger each slice via MIDI — or sequence them using the built-in step tracker (TRK) across up to four independent layers.
SAMPLES Page
The main editor. Load an audio file, set crop handles, detect hitpoints, clean up with the slice & sample tools, then commit slices. Slices are triggered via MIDI from the host piano roll (C1 = Slice 1, C#1 = Slice 2, etc.) or from the TRK tracker.
TRK Tracker
A Renoise-style step sequencer with up to four layers (L1–L4), each carrying its own sample. Build patterns in the step grid, arrange them in the SEQ list, set micro-timing offsets, apply per-step FX, and play back in sync with the host transport or run independently. Tap the TRK button in the transport bar to open.
Basic Workflow
1. Add dh-NOISE as an instrument track in your host application — 2. Tap Import to load an audio file — 3. Use the Preview button to audition and set crop handles — 4. Switch to the Slice tab and detect hitpoints — 5. Commit slices — 6. Open TRK to sequence slices across L1–L4, or draw MIDI notes in the host's piano roll — 7. Press Play
MIDI Note Map (SAMPLES mode)
C1 (note 36) = Slice 1 — C#1 = Slice 2 — D1 = Slice 3 — and so on up the keyboard. Up to 92 slices supported. Velocity controls volume of each triggered slice.
Layers (L1–L4)
Four independent sample layers. Each can carry a different audio file with its own hitpoints and slices. In TRK mode, each layer has its own step-pattern data. Load samples via the layer column on the left of the SAMPLES page.
Freeze & Mixdown
dh-NOISE fully supports host freeze and mixdown. All four TRK layers are captured in the rendered output. After unfreeze the plugin automatically restores all samples and slice points.
AUv3 Workflow
Setting Up in Your Host
1. Create a new Instrument track in your host application — 2. Tap the instrument slot and select dh slice from the instrument list — 3. Tap the instrument name to open the dh slice interface — 4. Press Import to load your audio file
Setting Slice Points
Use the Preview button to hear the full sample. Drag the green (start) and red (end) handles to crop if needed. Switch to the Slice tab and press Detect to automatically find transients, or tap the waveform to add hitpoints manually. Each hitpoint becomes a slice boundary.
Tempo Matching
Switch to the Grid tab. Press Auto BPM to detect the sample tempo. dh slice will time-stretch all slices to match your host project BPM using pitch-preserving processing. The stretch is applied automatically — no further action needed.
Playing Slices via MIDI
Draw MIDI notes in the host's piano roll on the dh slice track. C1 triggers Slice 1, C#1 triggers Slice 2, D1 triggers Slice 3 and so on. Velocity controls the volume of each triggered slice.
Shuffle Mode
Press Shuffle in the Slice tab sidebar to randomise the slice order. The MIDI map stays fixed — C1 still plays position 1 — but the audio at each position changes. Press Shuffle again for a new random order. Press Reset to restore the original arrangement.
Freeze & Mixdown
Close the dh slice interface and press Freeze in your host. The MIDI performance is rendered to audio through the native engine. After unfreezing, dh slice automatically reloads the sample and slice points ready for further editing.
Tips
— Use the green/red locators to preview just a section before slicing — Set Anti-Click to 5ms to avoid clicks at slice boundaries — Use the Grid tab beat grid to visually align hitpoints to the tempo — Slice glow confirms which slice is being triggered during playback
Transport Controls
dh-NOISE has no standalone transport — play/stop is driven by your host application. The leftmost button toggles between the SAMPLES editor and the TRK tracker; the rest of the bar carries dh-NOISE's own controls, which change with the active page.
SAMPLES page

| Control | Action |
|---|---|
| Preview | Audition the sample / selected region through the engine |
| Stop | Stop the preview |
| + HP / − HP | Add a hitpoint at the playhead / remove the nearest one |
TRK page

Left to right:
| Control | Action |
|---|---|
| Write (pencil) | Note-entry mode — tap pads / keys to write steps |
| WF entry | Note entry with automatic micro-timing — play the piano keyboard or send MIDI and your timing is captured into the pattern |
| Step gap | How many steps to advance between each added note |
| ⌫ | Delete / clear the current step |
| %Nudge | Inner ↑ / ↓ set the step's micro-timing, shown as % in the centre; outer ⤒ / ⤓ move the note up / down the timeline to an earlier / later step |
| Loop | Loop the current pattern |
| Play / SEQ | Play the current pattern; the SEQ half plays the whole arrangement |
| Sync | Latch to the host transport — playback follows the host, and the bar collapses to a slim handle to free screen space |
| Stop | Stop playback |
With host-sync on, the transport collapses to a grabber handle. Tap the handle to peek the bar back; tap again to tuck it away. See Tracker / TRK → Host Sync.
Waveform Display
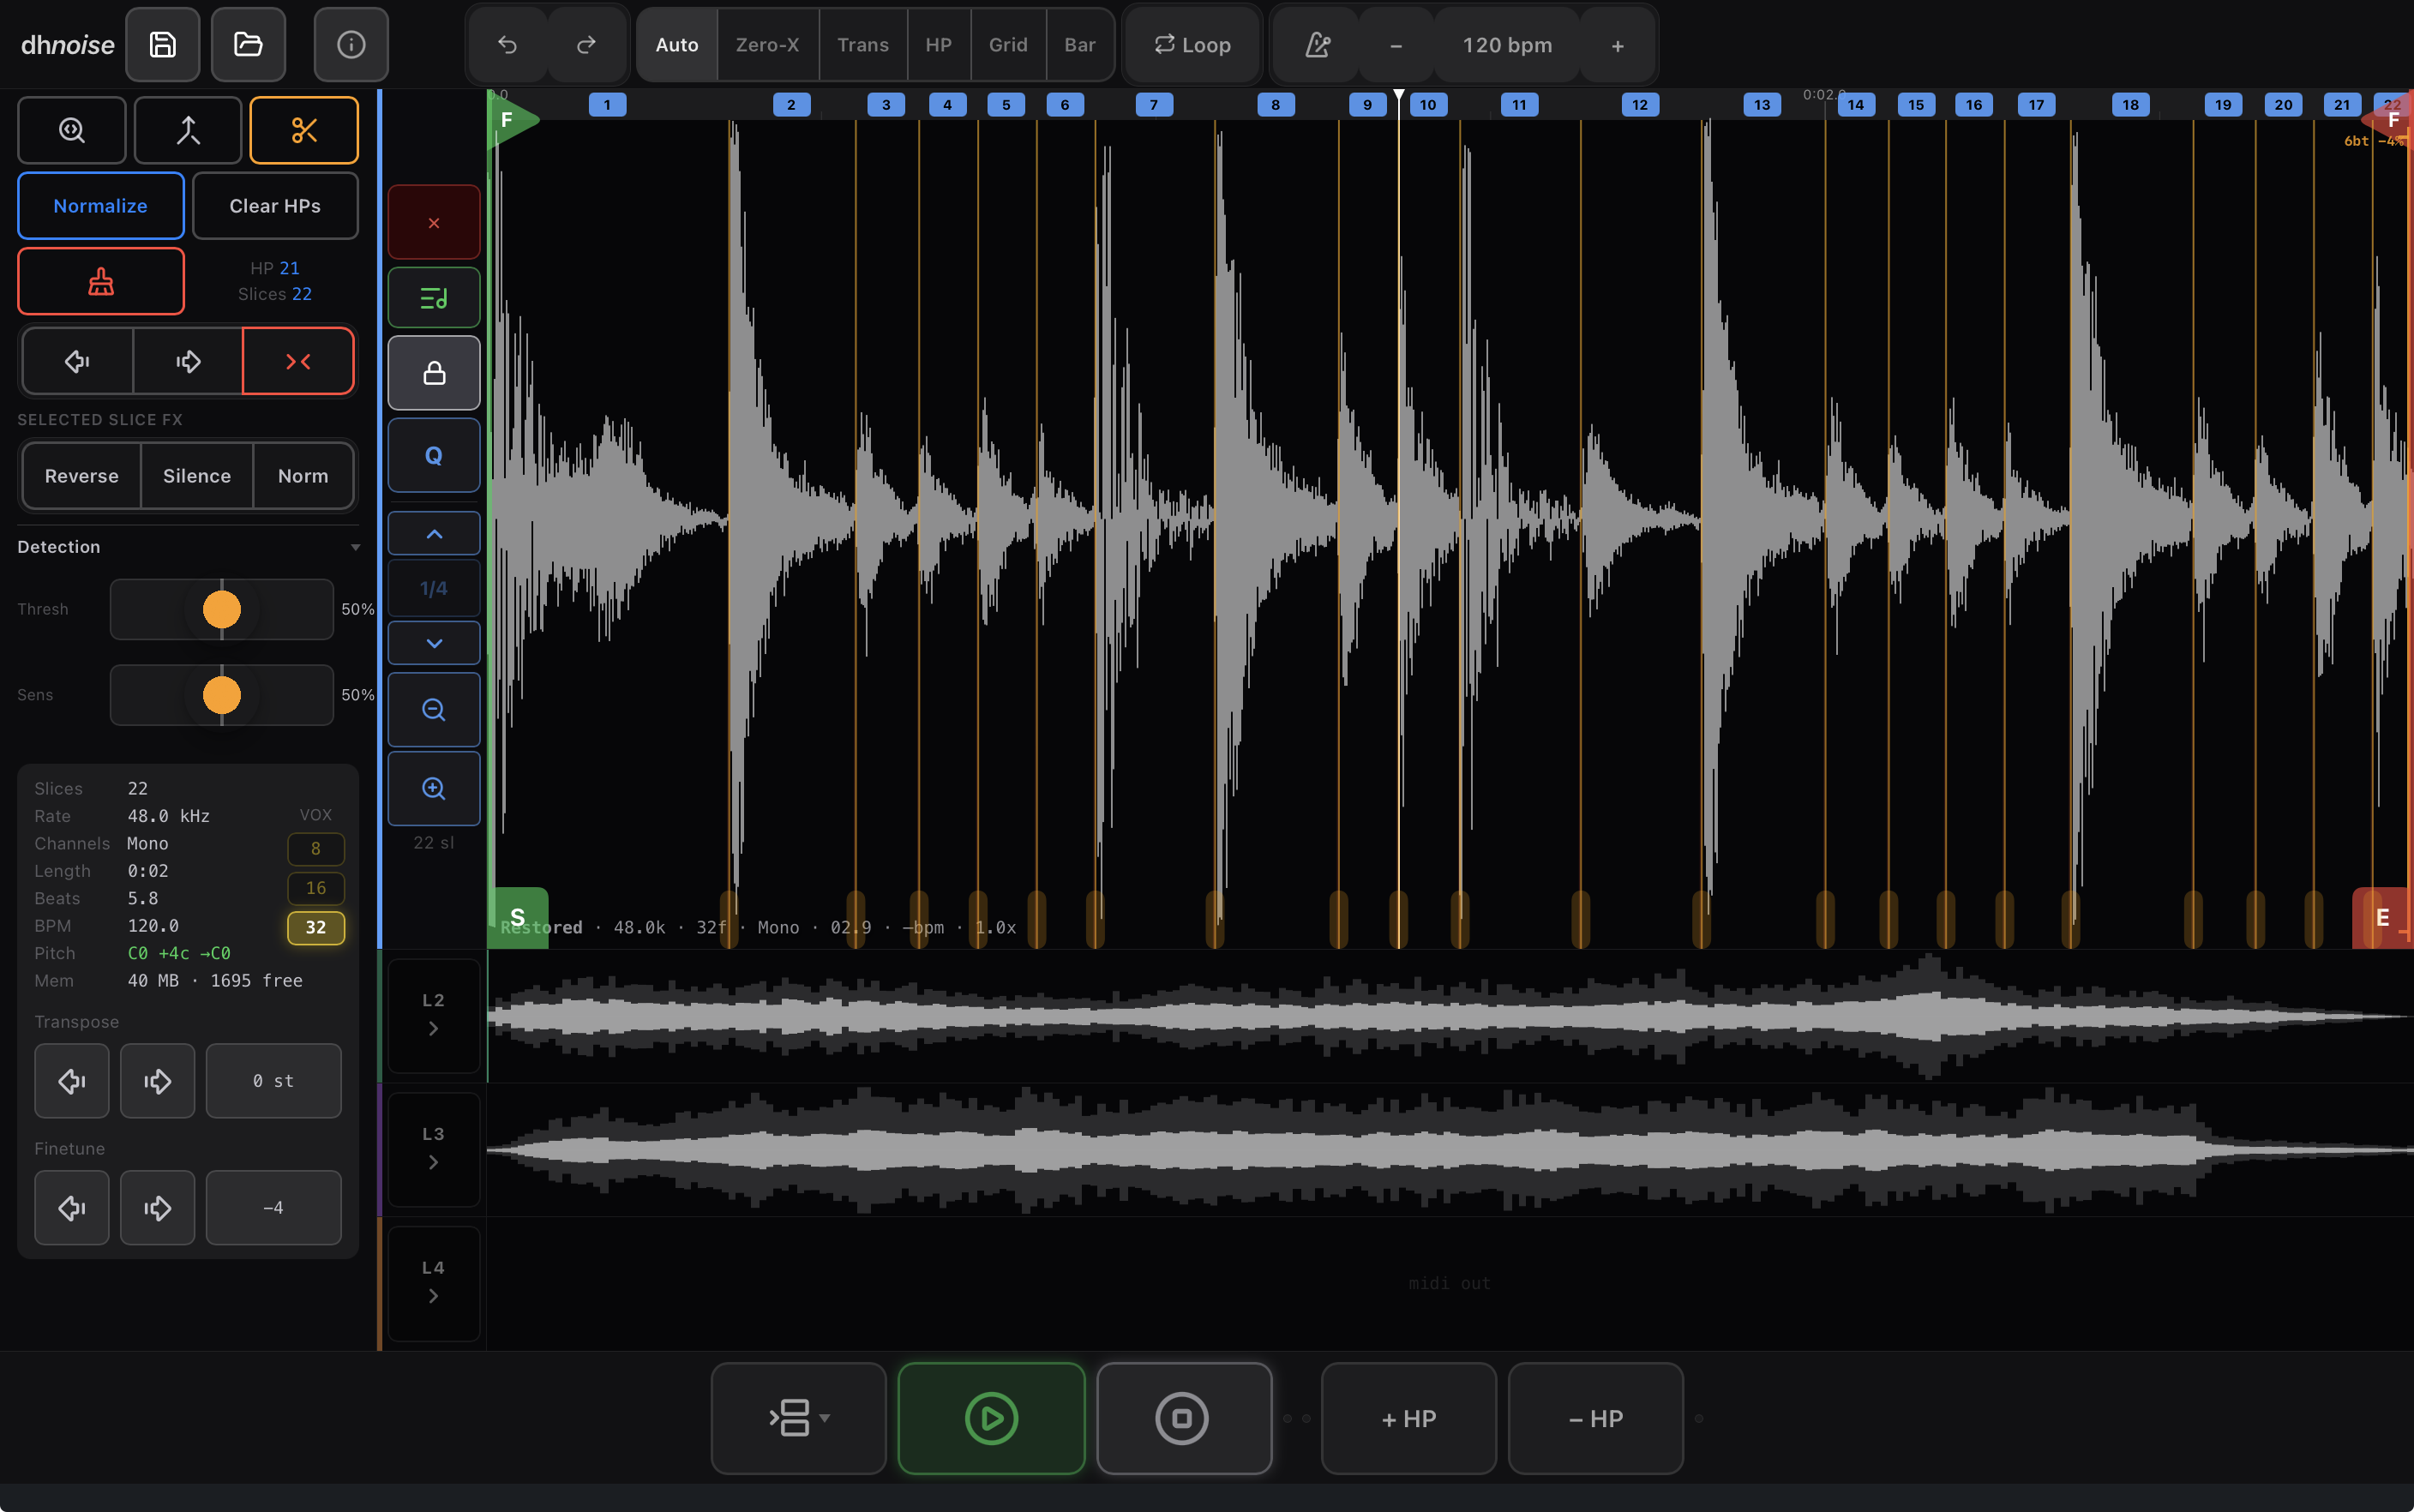
The main waveform view shows your audio with selection handles, hitpoint markers, and an overview bar.
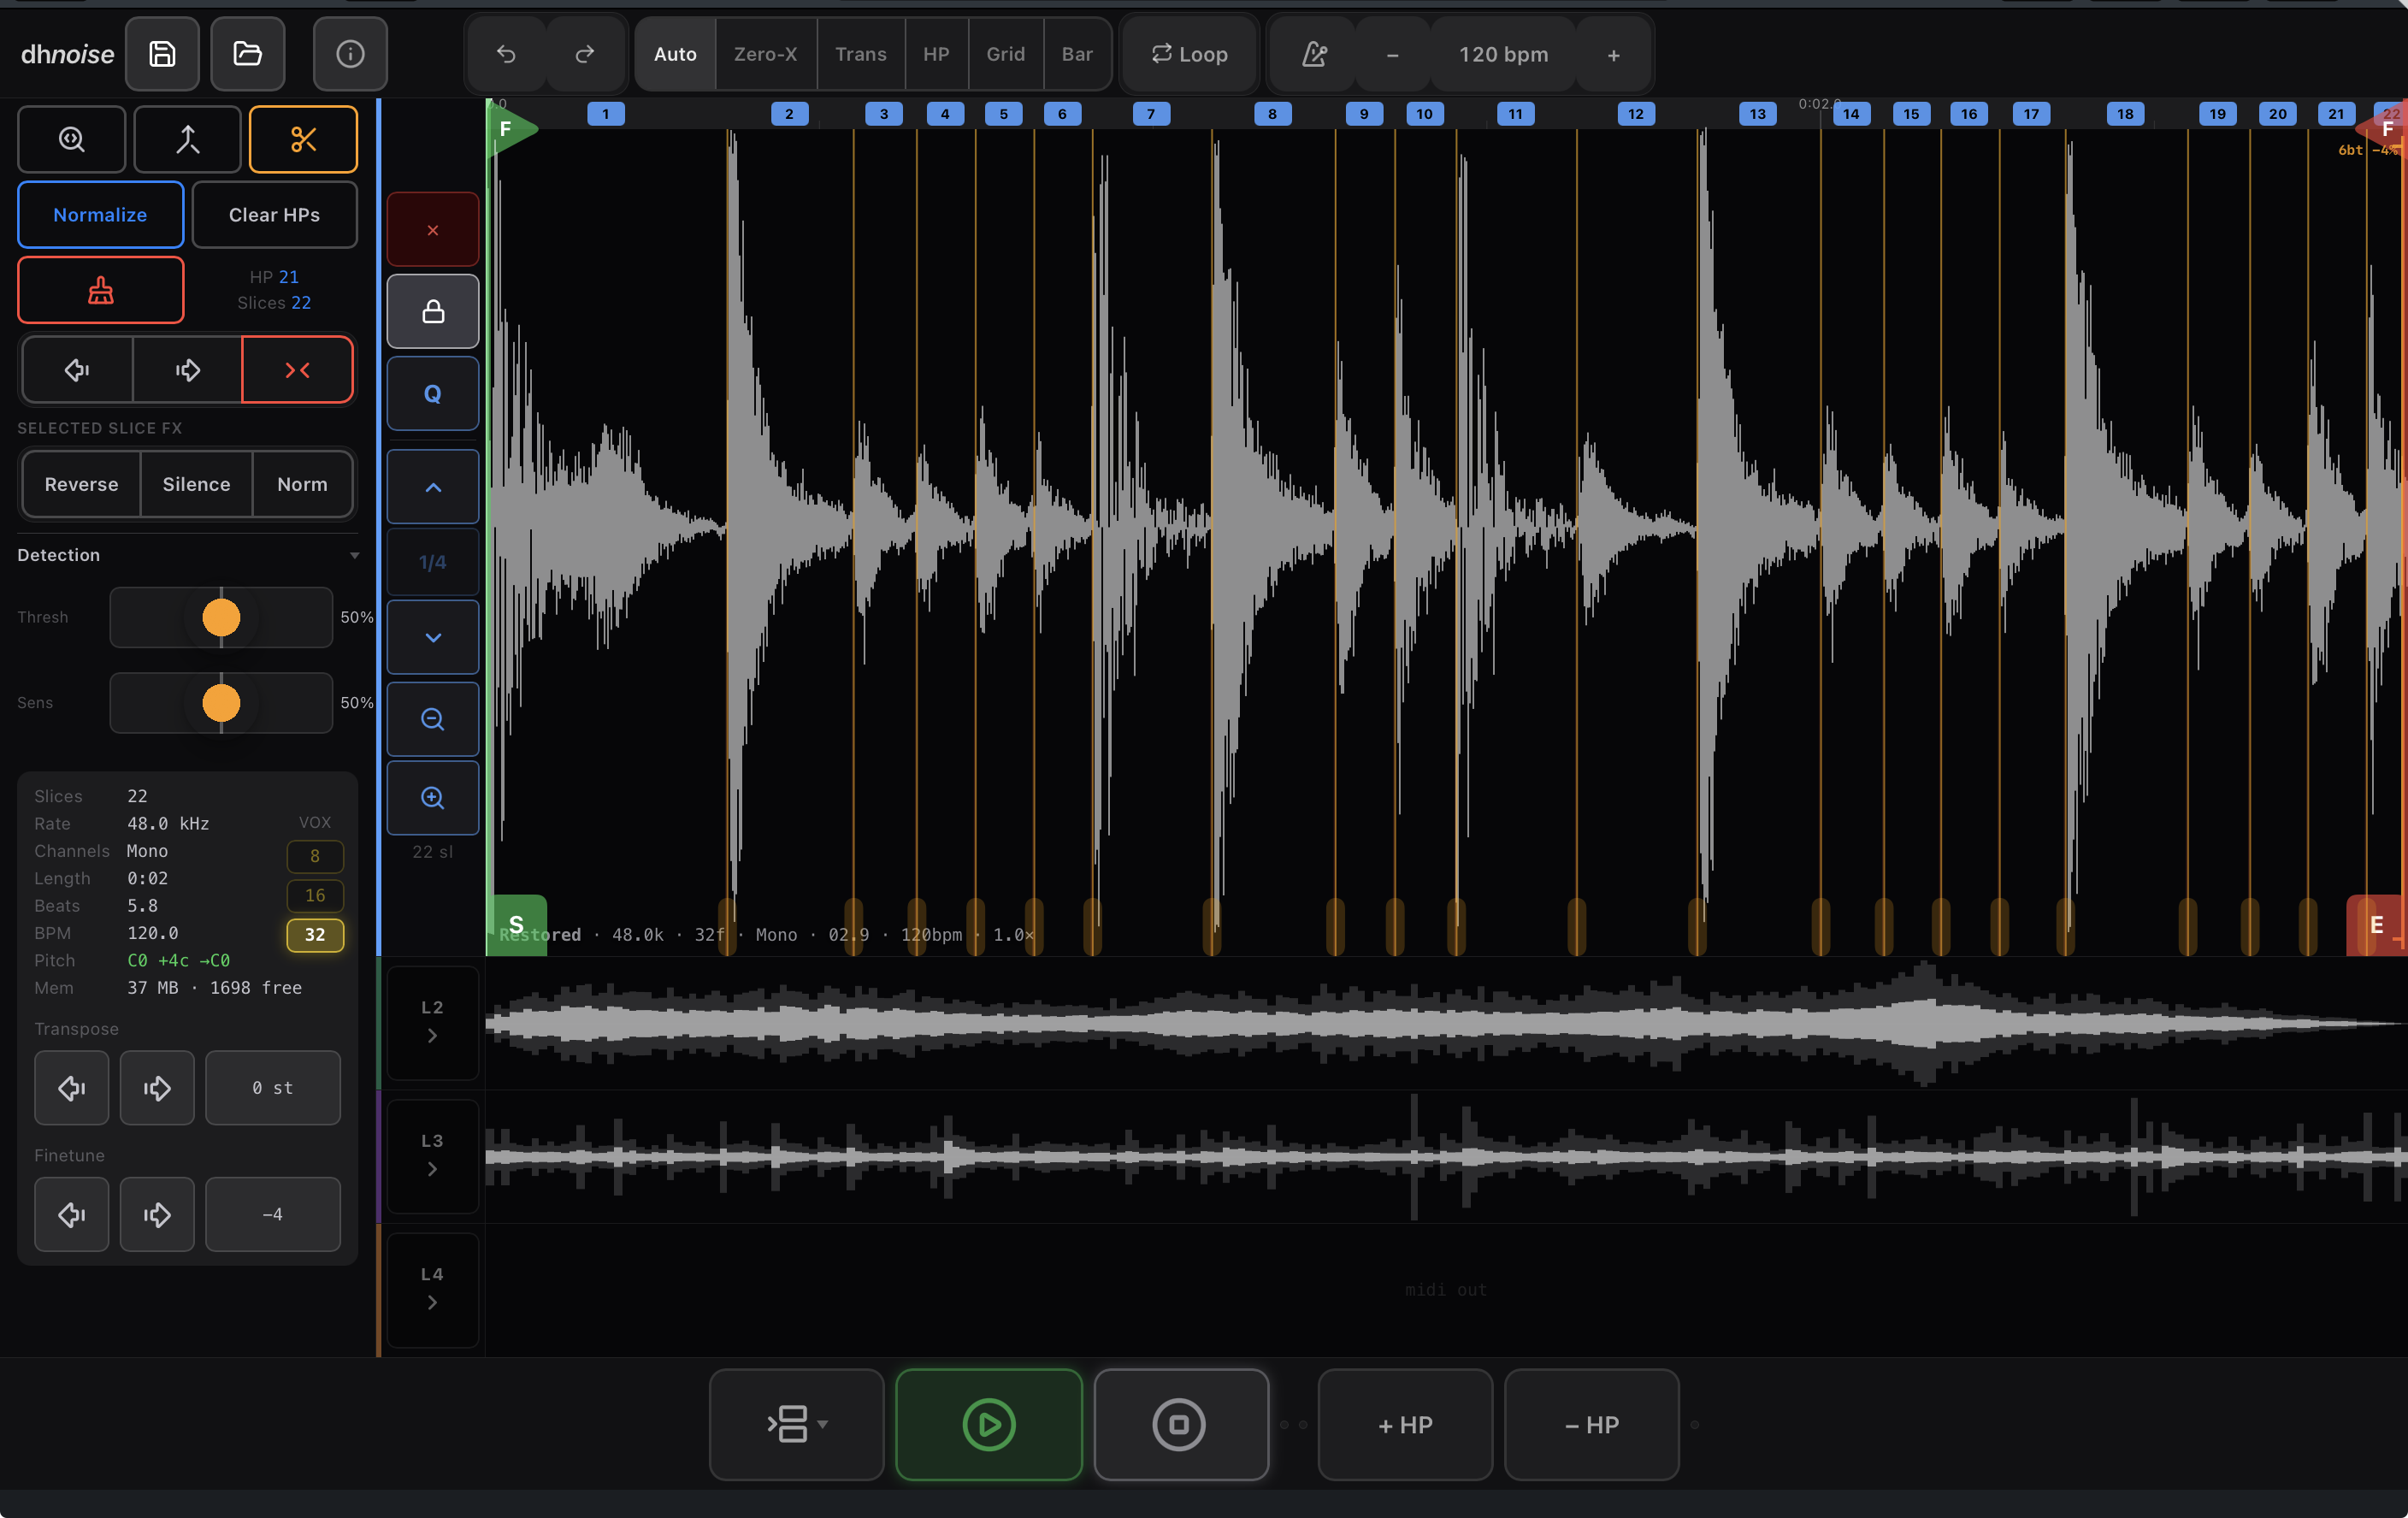
| -- Green = selection START
| -- Red = selection END
| -- Orange = slice hitpoints
[---] -- Overview bar shows visible region
| -- Red = selection END
| -- Orange = slice hitpoints
[---] -- Overview bar shows visible region
Navigation
| Gesture | Action |
|---|---|
| Pinch | Zoom in/out (up to 128x) |
| Drag (zoomed) | Scroll through waveform |
| Scroll wheel | Zoom in/out at cursor |
| Tap | Set playhead position or audition slice |
| + HP button | Add hitpoint at playhead position |
| − HP button | Remove nearest hitpoint to playhead |
| Drag waveform | Select region (adheres to snap) |
| Drag green/red handle | Move selection, snaps on release |
Waveform Toolbar
The vertical strip beside the waveform:
| Control | Action |
|---|---|
| ✕ | Unload the sample from the active layer |
| Lock | Lock the hitpoint markers so they can't be nudged by accident |
| Coarser / finer grid spacing | Coarser / finer grid spacing |
| 1/4 … | Grid resolution / time-signature division |
| Zoom out / in | Zoom the waveform out / in |
| n SL | Current slice count |
Grid & BPM
The Grid tab controls the tempo grid overlay used for beat/bar snapping and visual alignment.
| Setting | Description |
|---|---|
| Tempo | BPM value (20-300), use +/- or type |
| Time Sig | 4/4, 3/4, 6/8, 5/4 |
| Resolution | Grid density: Bar, 1/2, 1/4, 1/8 |
| Auto | Auto-detect BPM from transients |
| Show / Clear | Toggle grid visibility |
Set BPM and show grid before using Beat or Bar snap modes.
Slicer
Detects and manages hitpoints that divide audio into slices for individual export.
Detection Modes
| Mode | Best For |
|---|---|
| Transient | Percussive material (drum hits, attacks) |
| Equal | Uniform divisions (4, 8, 16, 32, 64 chops) |
Controls
| Slider | Effect |
|---|---|
| Threshold | Higher = more sensitive = more hitpoints |
| Min Gap | Minimum distance between hitpoints (10-500ms) |
Hitpoint Management
| Action | How |
|---|---|
| Add | + HP button in transport bar |
| Remove | Double-tap marker or tap x in slice list |
| Move | Drag orange marker (snaps to current mode) |
| Audition | Tap slice in list or tap between markers |
Anti-Click
| Mode | Method |
|---|---|
| 5ms / 8ms / 12ms | Micro gain ramp at slice edges |
| Zero-X | Nudge edges to nearest zero crossing |
| HP | Snap handles to nearest hitpoint marker |
| Off | No processing |
Slice Options
| Option | Visual | Effect |
|---|---|---|
| Fade (0-50ms) | Green/red triangles | Volume ramp at slice edges |
| Tail (0-200ms) | Orange region past edge | Extends slice for natural decay |
| X-Fade (0-50ms) | — | Crossfade between adjacent slices — extends each slice into its neighbours with a smooth blend. Eliminates clicks at slice boundaries without silencing. Applied during both audition and export. |
| Prefix | -- | Filename prefix for exports |
Slice & Sample Tools
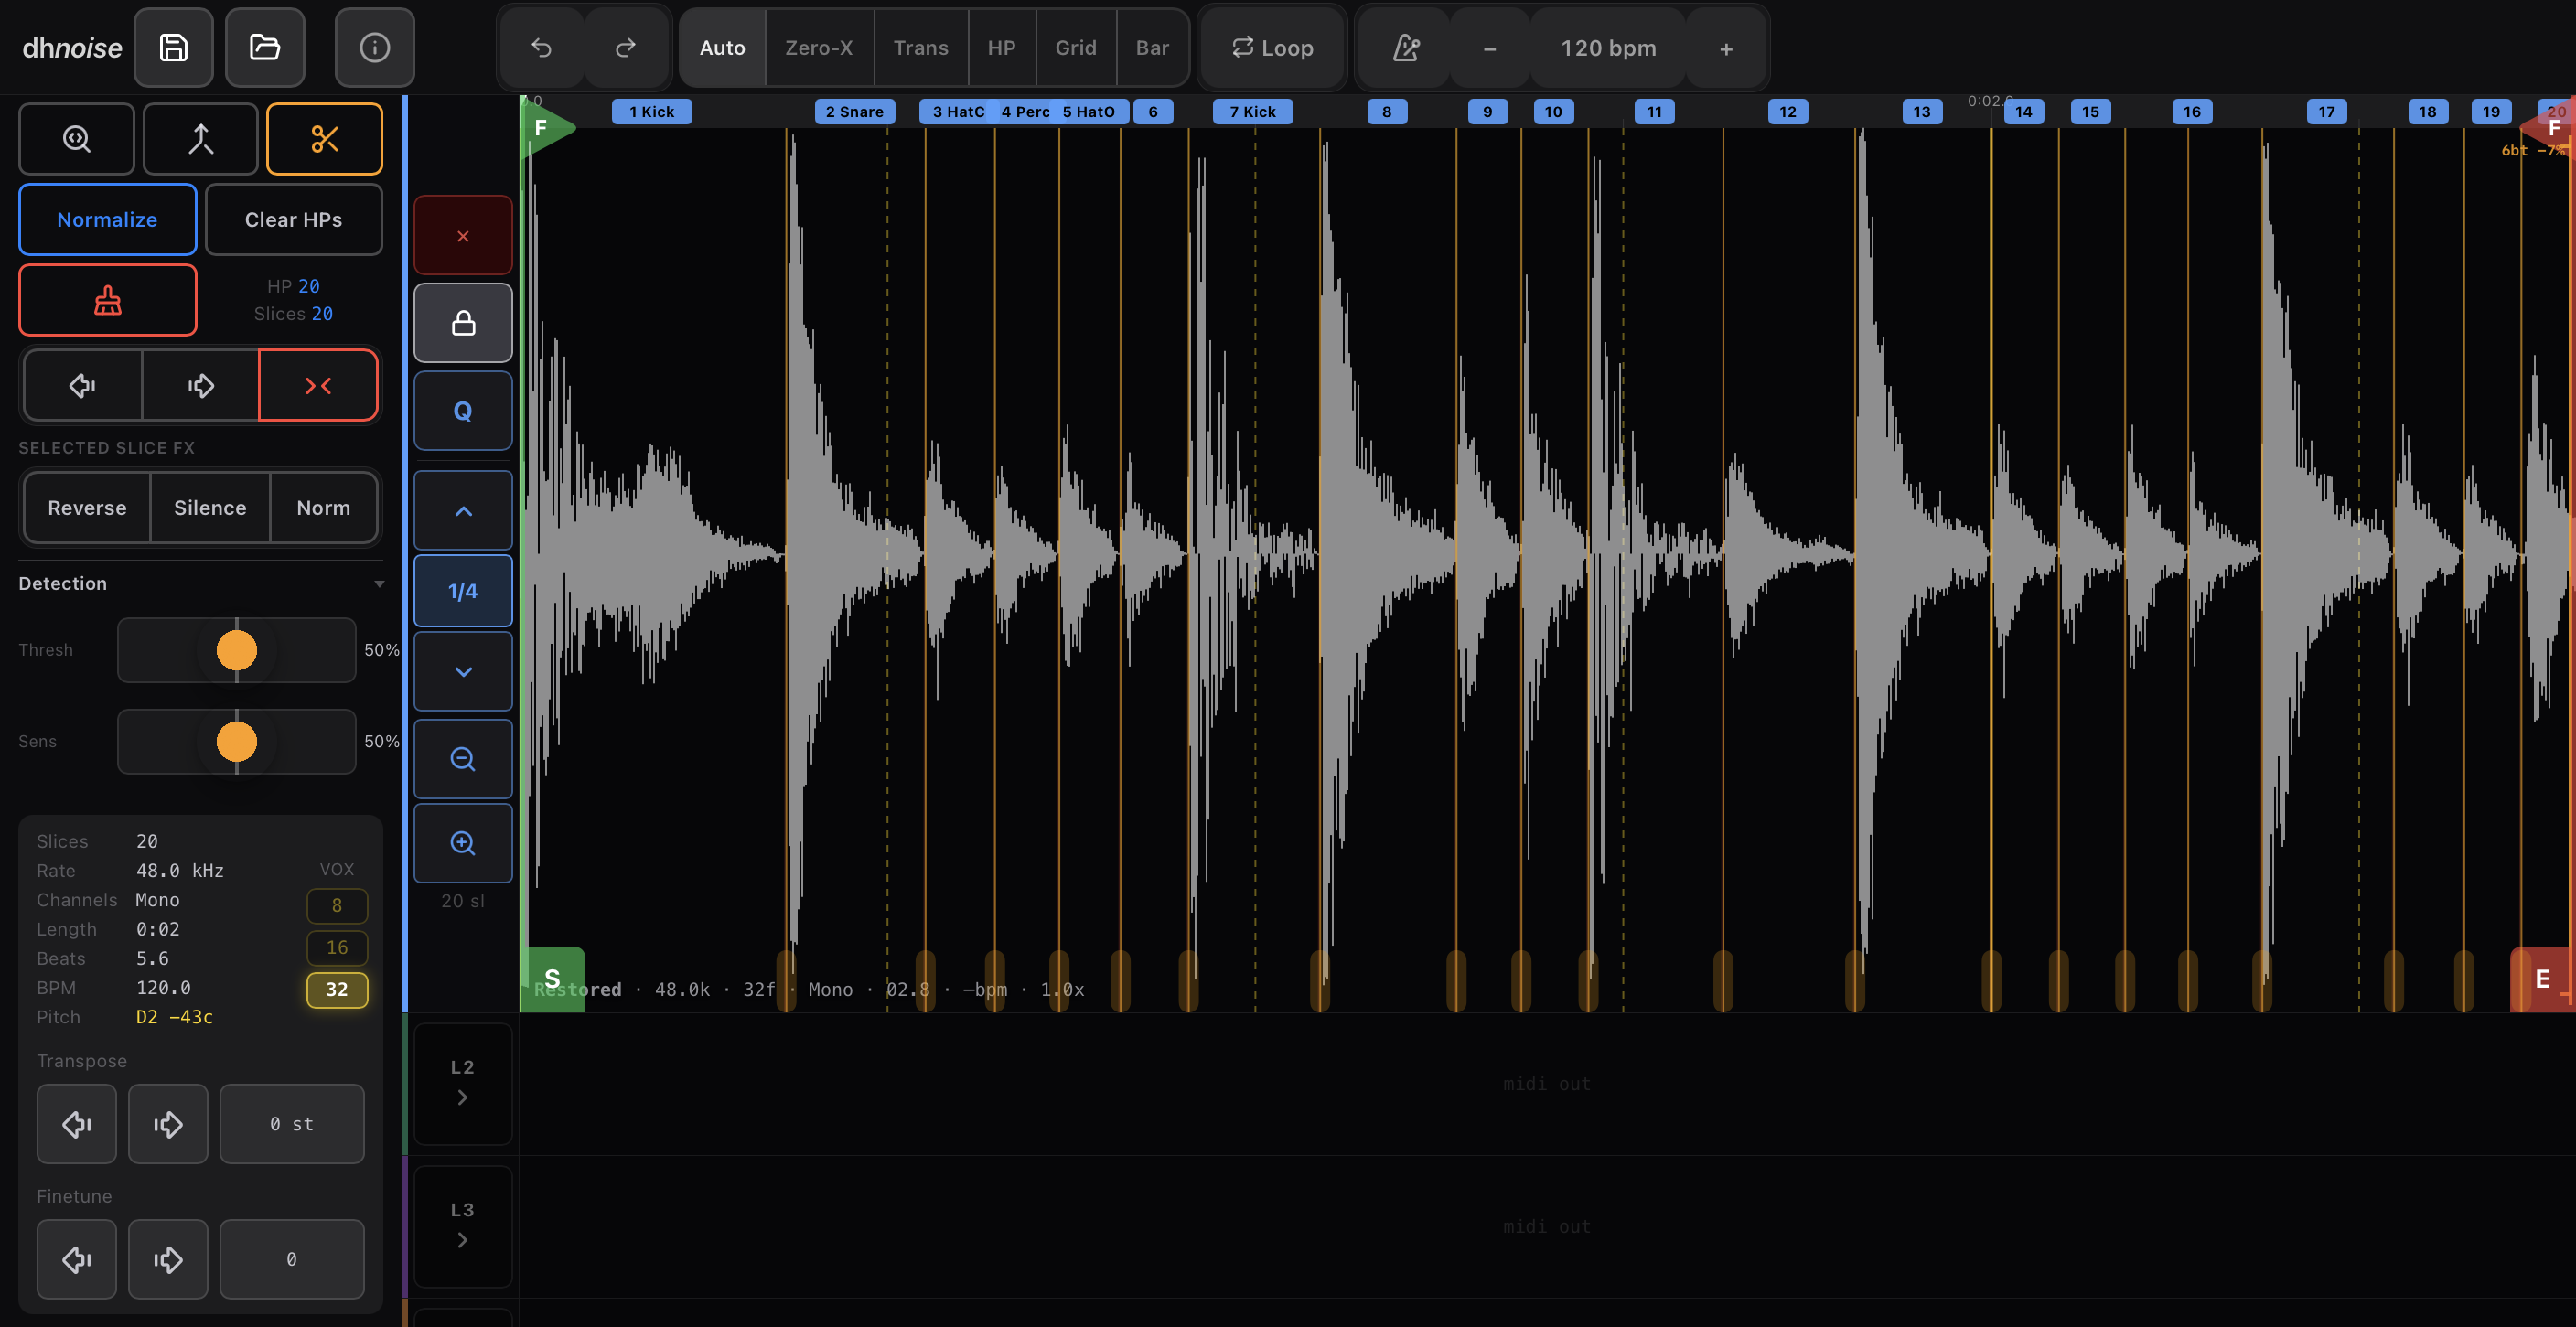
Destructive editing for the whole sample or individual slices. Everything applies to the active layer.
Sample Tools
| Tool | Action |
|---|---|
| Detect | Auto-find hitpoints (Transient or Equal divisions) |
| Trim | Crop the audio to the green/red selection |
| Normalize | Scale the sample so its peak hits the target level |
| To Mono | Downmix a stereo sample to mono (re-carves existing slices) |
| Clear HPs | Remove all hitpoints |
| Transpose | Shift the sample's pitch in semitones (− / +) |
| Finetune | Fine pitch adjustment in cents (− / +) |
Per-Slice FX
Double-tap a slice (in the waveform or the slice list) to select it, then apply:
| Tool | Action |
|---|---|
| Reverse | Play that slice backwards |
| Silence | Replace the slice with silence |
| Normalize | Normalize just that slice |
Fades
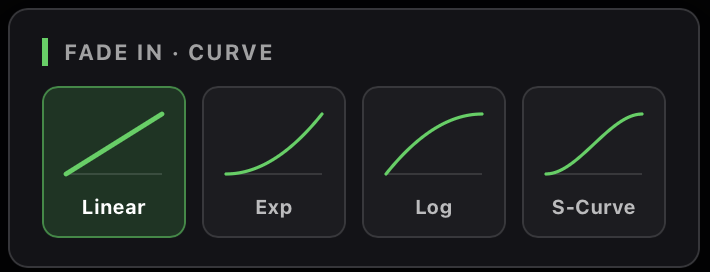
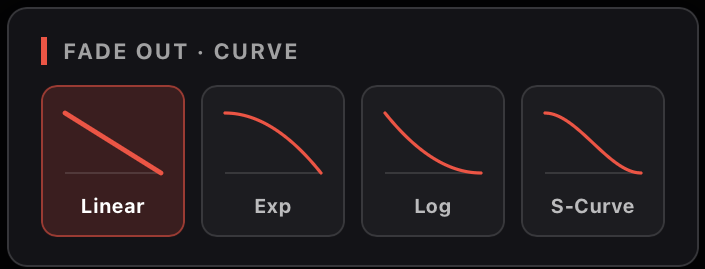
Drag the green (start) or red (end) F flag to set a fade length. Tap the flag to cycle the curve (Linear → Exp → Log → S-Curve); long-press it to open the visual curve picker and tap a shape.
Snap Modes
Snap affects selection handles, hitpoint markers, and manual placement. Set via nav bar or Slice tab sidebar (both stay synced).
| Mode | Snaps To | Best For |
|---|---|---|
| Auto | Free positioning | Precise manual placement |
| Zero-X | Nearest zero crossing | Click-free editing |
| Trans | Nearest energy onset | Aligning to drum hits |
| HP | Nearest existing hitpoint | Aligning edits to slices |
| Grid | BPM grid × resolution | Musical timing |
| Bar | Full bar boundaries | Selecting whole bars |
Handle snap fires on release (not during drag). A white flash and toast confirm snap position. Hitpoint markers snap during drag.
MIDI
In the AU build, MIDI is routed by your host. Add dh-NOISE to an instrument track in your host application, then play or draw MIDI on that track — the notes reach dh-NOISE automatically. No in-plugin device pairing is needed.

Note Map (SAMPLES)
C1 (note 36) = Slice 1, C#1 = Slice 2, D1 = Slice 3, and so on up the keyboard — up to 92 slices. Velocity sets the volume of each triggered slice.
MIDI Out (TRK)
Each tracker layer can emit MIDI out as it plays — notes, chords, and inversions — so a layer can drive another instrument in your host as well as (or instead of) its own slices. Toggle per-layer MIDI-out in the layer controls.
Import
Supported formats: WAV, MP3, AIFF, FLAC, OGG, M4A, CAF. Tap Import (or a layer's Load button) to open the iOS document picker. Each of the four layers (L1–L4) can load its own file. The picker also accepts Akai sample-CD images (.iso) — see Akai Sample CDs below.
Audition
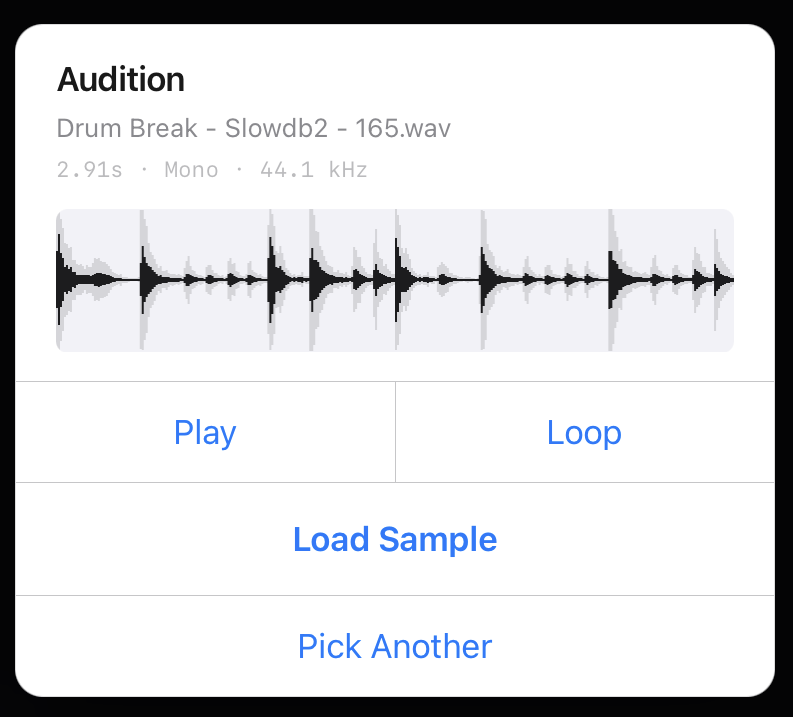
After you pick a file, an Audition card previews it before committing — it shows the name, length, channels and sample rate over a waveform. Play / Loop to hear it, Load Sample to load it into the active layer, or Pick Another to choose a different file.
Akai Sample CDs (.iso)
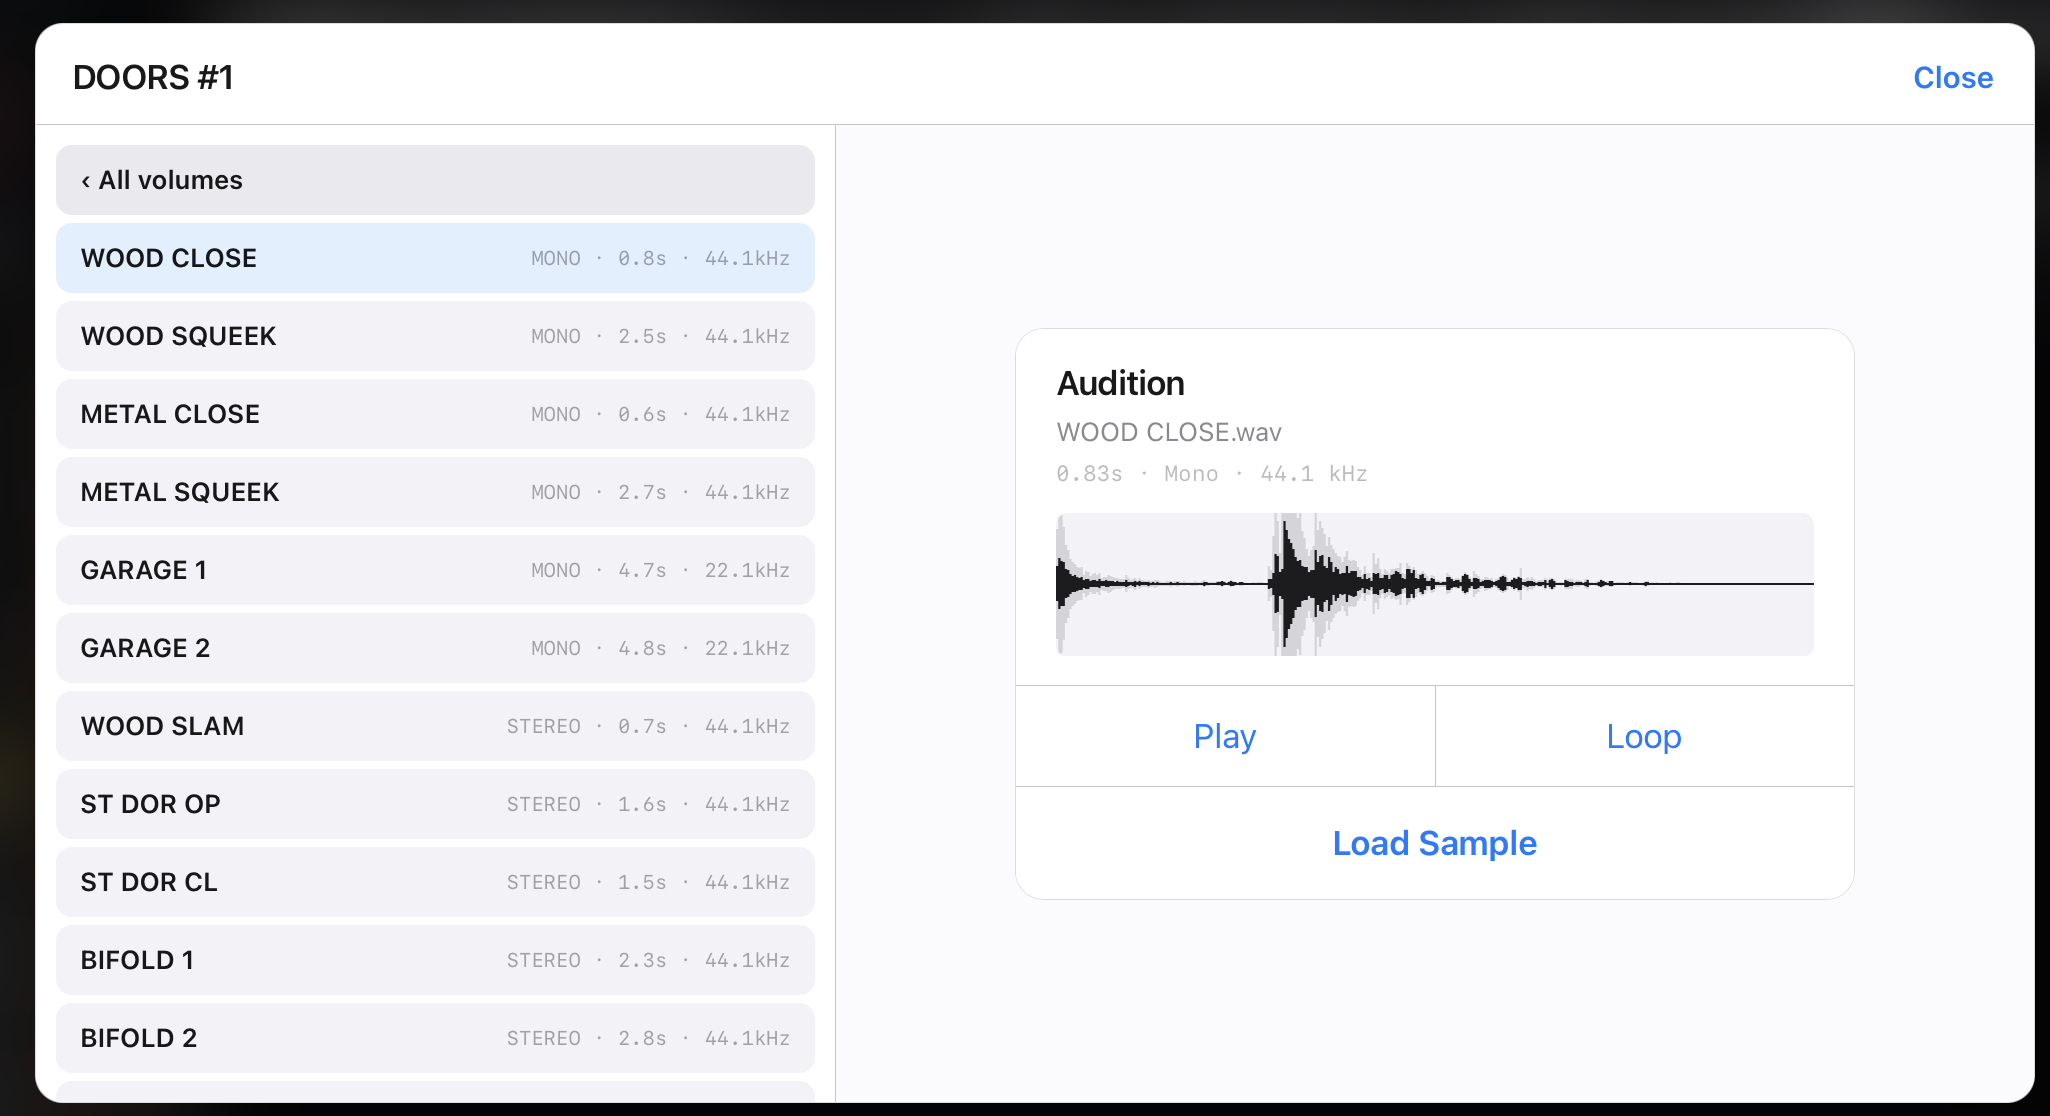
dh-NOISE reads vintage Akai S1000 / S3000-format sampler CD-ROMs. Rip the disc to a plain .iso (2048-byte sectors), then pick it from a layer's Load button. A browser window opens with the disc's volumes and samples listed on the left; tap any sample to audition it in the panel on the right, then Load Sample to load it into the active layer. Stereo samples (stored as separate -L / -R files on the disc) are merged automatically, and each sample's original root note is read from its header so it plays in tune on the keyboard.
Akai images use a proprietary disc layout, not ISO9660. A raw BIN/CUE rip won't load — convert it to a cooked .iso first. Late-era S5000 / S6000 discs use plain WAV files and don't need this browser.
There is no in-app file export in the AU build — render your sliced / sequenced output through the host application (Freeze or Mixdown), which captures all four layers.
Workflow Guide
Slicing a Drum Loop
1. Import audio file
2. Grid tab: set BPM (or Auto) and press Show
3. Slice tab: Transient mode, adjust threshold
4. Press Detect -- orange markers appear
5. Fine-tune: drag to adjust, double-tap to remove, + HP / − HP buttons
6. Set Anti-Click 5ms, Fade 2ms
7. Audition each slice by tapping the list
8. Commit — then trigger via MIDI (C1 = Slice 1) or sequence in TRK
Cleaning a Sample
1. Import the sample
2. Set the green/red handles, snap Zero-X, Trim
3. Normalize (the Normalize button, or double-tap a slice → Norm)
4. Commit — ready to play or sequence
Equal Chops
1. Import, set Equal mode
2. Tap the division count (4 / 8 / 16 / 32 / 64)
3. Anti-Click 5ms, add a 20–50ms tail
4. Commit
Touch Gestures
| Gesture | Where | Action |
|---|---|---|
| Pinch | Waveform | Zoom (1x-128x) |
| Drag | Waveform (zoomed) | Scroll |
| Tap | Waveform | Set playhead / audition slice |
| + HP | Transport bar | Add hitpoint at playhead |
| − HP | Transport bar | Remove nearest hitpoint |
| Drag | Waveform body | Select region |
| Double-tap | Hitpoint marker | Remove hitpoint |
| Drag | Green/Red handle | Move selection (snap on release) |
| Drag | Orange hitpoint | Move (snap during drag) |
| Tap | Slice list | Audition slice |
| Tap x | Slice list | Remove hitpoint |
| Double-tap | Slice (waveform or list) | Select slice — enables per-slice FX (Reverse / Silence / Norm) |
| Long-press | Hitpoint marker | Mute / unmute it (merges or splits the slice) |
| Long-press | Slice number | Rename the slice (label popover) |
| Tap | Fade flag (F) | Cycle fade curve: Linear → Exp → Log → S-Curve |
| Long-press | Fade flag (F) | Open the fade-curve picker (tap a shape to choose) |
| Drag | Fade flag (F) | Set fade-in (green) / fade-out (red) length |
Tracker Grid
| Gesture | Where | Action |
|---|---|---|
| Tap | DCY cell | Cycle decay: 0 → 1 → 2 → 4 → 8 → 16 steps |
| Long-press | DCY cell | Reset decay to 0 |
| Long-press | SL (slice) cell | Open the chord picker for that step |
| Long-press | Any other cell | Toggle step mute |
Nav Bar
Nav buttons share the gray transport theme and flash their action colour briefly on tap.
| Button | Action |
|---|---|
| Undo / Redo | Edit-history navigation |
| Auto BPM | Detect the sample tempo |
| Snap modes | Auto / Zero-X / Trans / HP / Grid / Bar |
| ? | Open this help |
Tracker / TRK
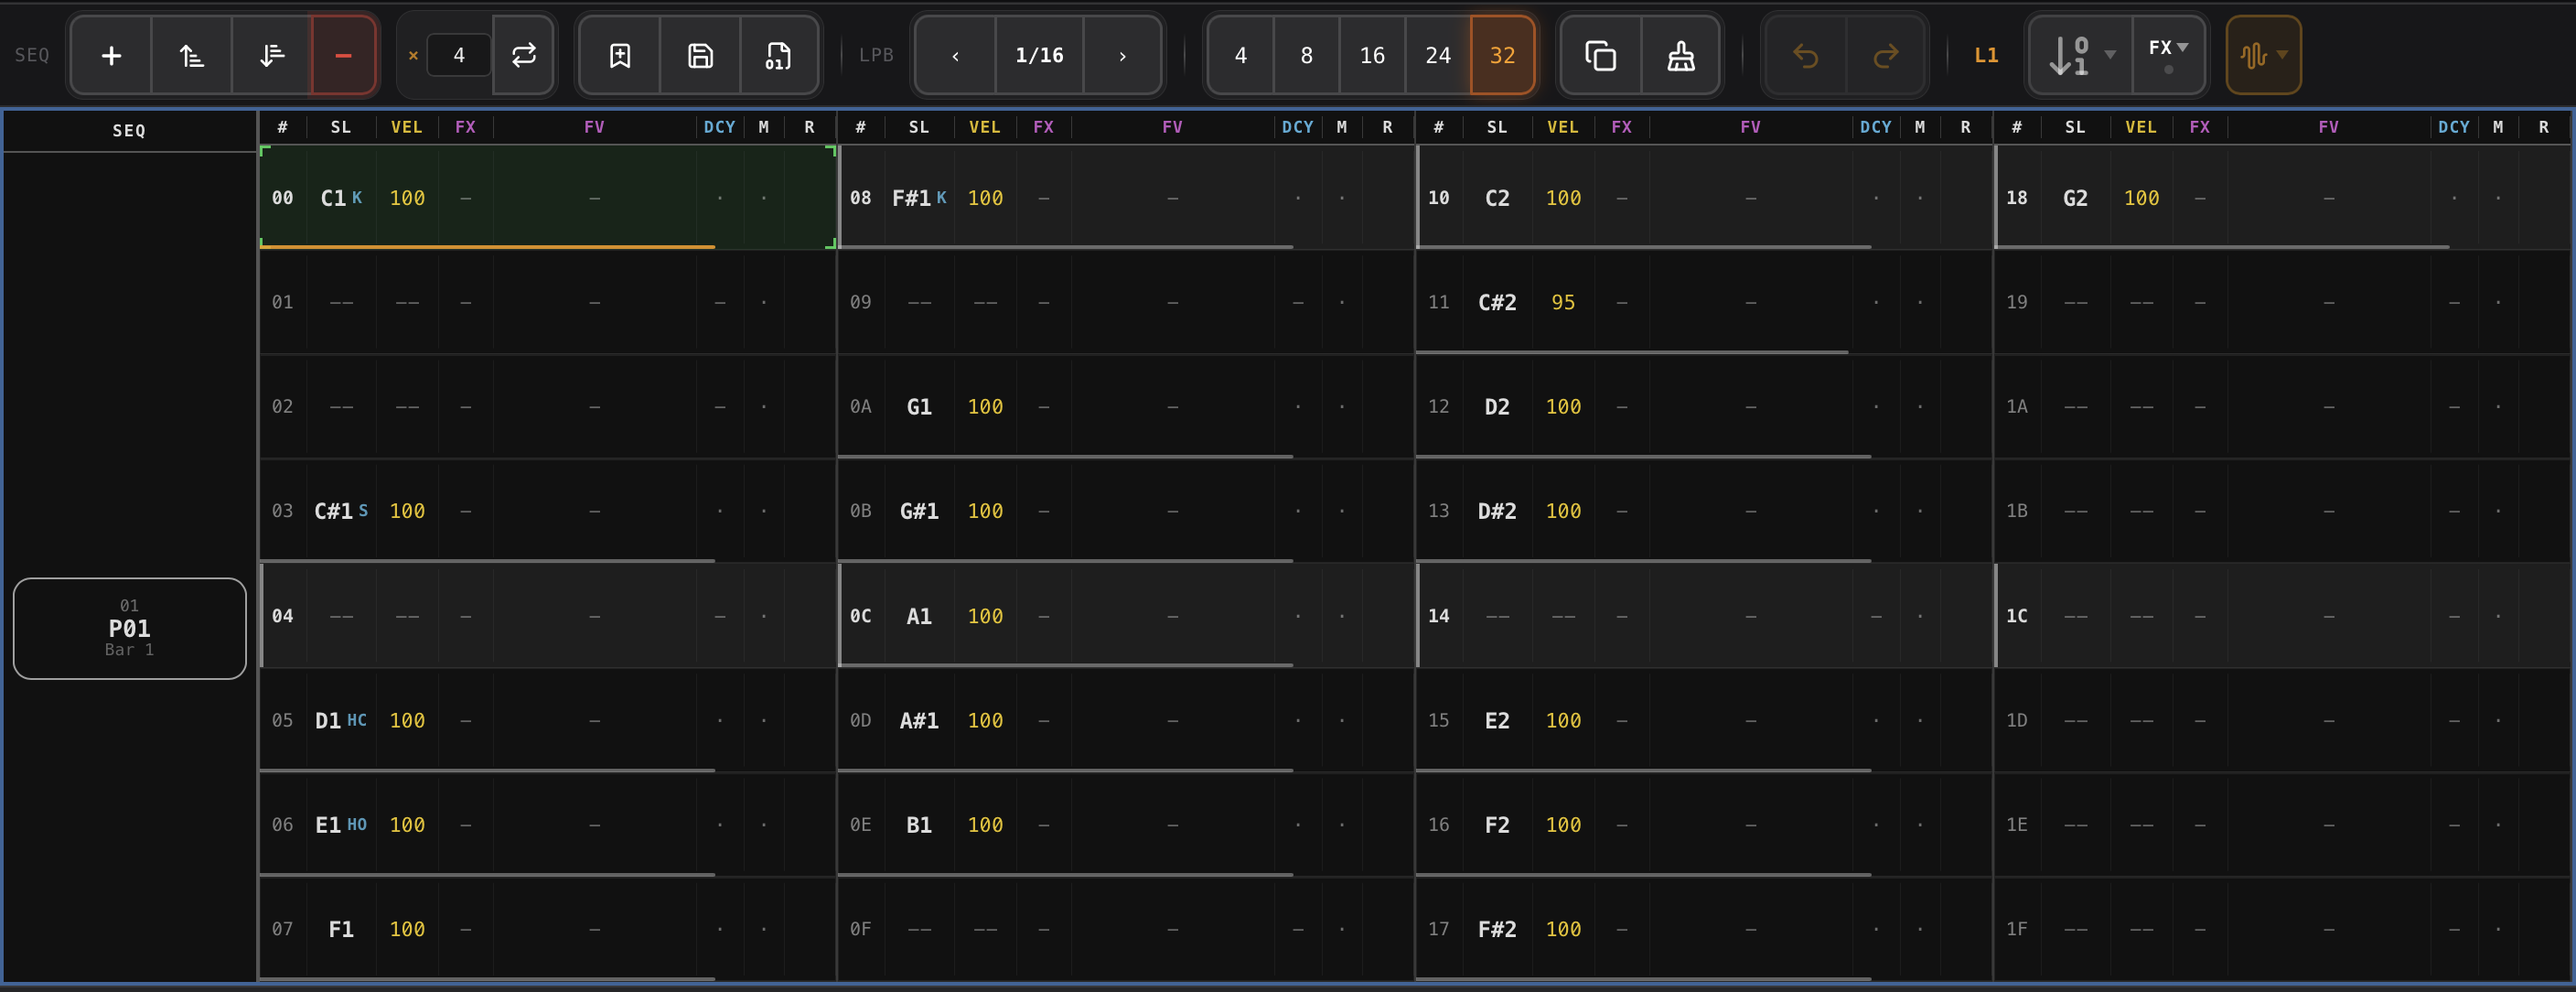
The TRK tracker is a Renoise-style step sequencer built into dh-NOISE. Open it by tapping the TRK button in the SAMPLES transport bar. Up to four independent layers (L1–L4) each carry their own sample and step patterns. Patterns are arranged in a SEQ list to build complete song arrangements.
Layers (L1–L4)
Each layer is an independent instrument track. Switch between layers using the L1/L2/L3/L4 buttons at the top of the tracker. The active layer's step grid, note input, and FX all apply to that layer only. Each layer can carry a completely different audio file with its own committed slices.
Step Grid (Phrase Editor)
The main editing area. Each row is one step. Columns show: # (step number), SL (slice index), VEL (velocity 0–127), FX (effect type), FV (effect value), DCY (decay), M (mute), R (reverse).
| Column | Description |
|---|---|
| SL | Slice index — which slice of the layer's audio fires on this step |
| VEL | Velocity (volume) 0–127 |
| FX | Effect: none, PAN, PCH (pitch), HP filter, LP filter, DECAY, CHOKE |
| FV | Effect value (depends on FX type) |
| DCY | Decay — note cut after N steps, or OFF marker for a previous decay |
| M | Mute — step is preserved but silenced |
| R | Reverse — play slice backwards |
Pattern Length & LPB
Pattern length: 4, 8, 16, 24, 32, or 64 steps. At 64 the grid keeps the same comfortable cell width by laying out as four columns of 16 rows. LPB (Lines Per Beat): sets the musical resolution — 4 LPB = 1/16 note per step at default. Change LPB to get triplets or other resolutions. The + / – buttons add or remove steps one at a time.
SEQ List (Arrangement)
Patterns are arranged in the SEQ list on the left. Each slot (P01, P02 …) points to a pattern. During playback, slots chain in order — P01 plays first, then P02, etc. Tap a slot to select it for editing. Use Dup to duplicate a pattern into the next slot. All four layers share the same SEQ arrangement.
Note Input Methods
| Method | How |
|---|---|
| WF entry (auto micro-timing) | With WF entry armed, play the piano keyboard or send MIDI — notes are written to the pattern with the timing of your playing captured automatically. (Tapping the waveform no longer writes to the pattern.) |
| Piano keyboard | Tap a key in the on-screen keyboard to set the note/slice for the current step. Advances cursor after entry. |
| Step-record (live) | Enable Write mode and press Play. Tap pads or keyboard keys — steps are recorded in real time at the current playhead position. |
| Direct edit | Tap any row in the step grid to select it, then use the note entry bar to change slice, velocity, FX, and reverse. |
Chromatic Keyboard & Root Note
When a layer holds an un-sliced sample, the pads become a chromatic piano keyboard — each key pitches the whole sample. The root key (highlighted) is where the sample plays at its natural pitch. dh-NOISE sets it automatically: from an Akai disc header, from a note name in the file name (e.g. "Bass_C3.wav"), or from pitch detection. The keyboard centres on that root, and the ◂ ▸ arrows scroll it a full octave at a time so roots above or below the default range stay reachable. Tap the 25 / 49 key-count toggle to widen or narrow the visible span.
Micro-Timing
Each step has a delay offset (−45% to +45% of the step duration). Negative = pull early (fires before the beat), positive = push late (fires after the beat). When notes are entered with WF entry, the offset is captured automatically from the timing of your playing. This is the same system as Renoise's micro-timing.
Host Sync
The Sync button (chain-link icon) locks the tracker to the DAW host transport. When on, the step cursor follows the host playhead position in real time — useful for recording into a running DAW. When off, the tracker uses its own internal clock and plays independently of the host. With Sync on, the bottom transport bar also collapses to a slim grabber handle to reclaim vertical space for the grid and mixer — tap the handle to peek the bar back, tap again to tuck it away.
To Freeze or Mixdown in your host, turn Sync ON. An offline bounce is driven by the host transport, so the tracker only plays — and renders — while it follows the host. With Sync off the tracker runs on its own clock, which an offline bounce can't drive, so the render comes out silent.
Transport
| Button | Action |
|---|---|
| Play | Start internal playback from selected SEQ slot |
| Play (SEQ) | Play all patterns in the SEQ list in order |
| Stop | Stop playback. White playhead parks at stop position. Double-tap to rewind to step 00. |
| Loop | Loop the current pattern continuously |
| Write | Arm step-record mode — steps are written as you tap pads |
Per-Step Effects

| FX Type | FV Range | Effect |
|---|---|---|
| PAN | 0–255 | Stereo panning (128 = centre) |
| PCH | ±12 semitones | Pitch shift |
| HP | 0–127 | High-pass filter cutoff |
| LP | 0–127 | Low-pass filter cutoff |
| CHOKE % | 0–100% | Cut previous note after % of its duration |
| DECAY steps | 1–64 | Cut note after N pattern steps |
Chord Input
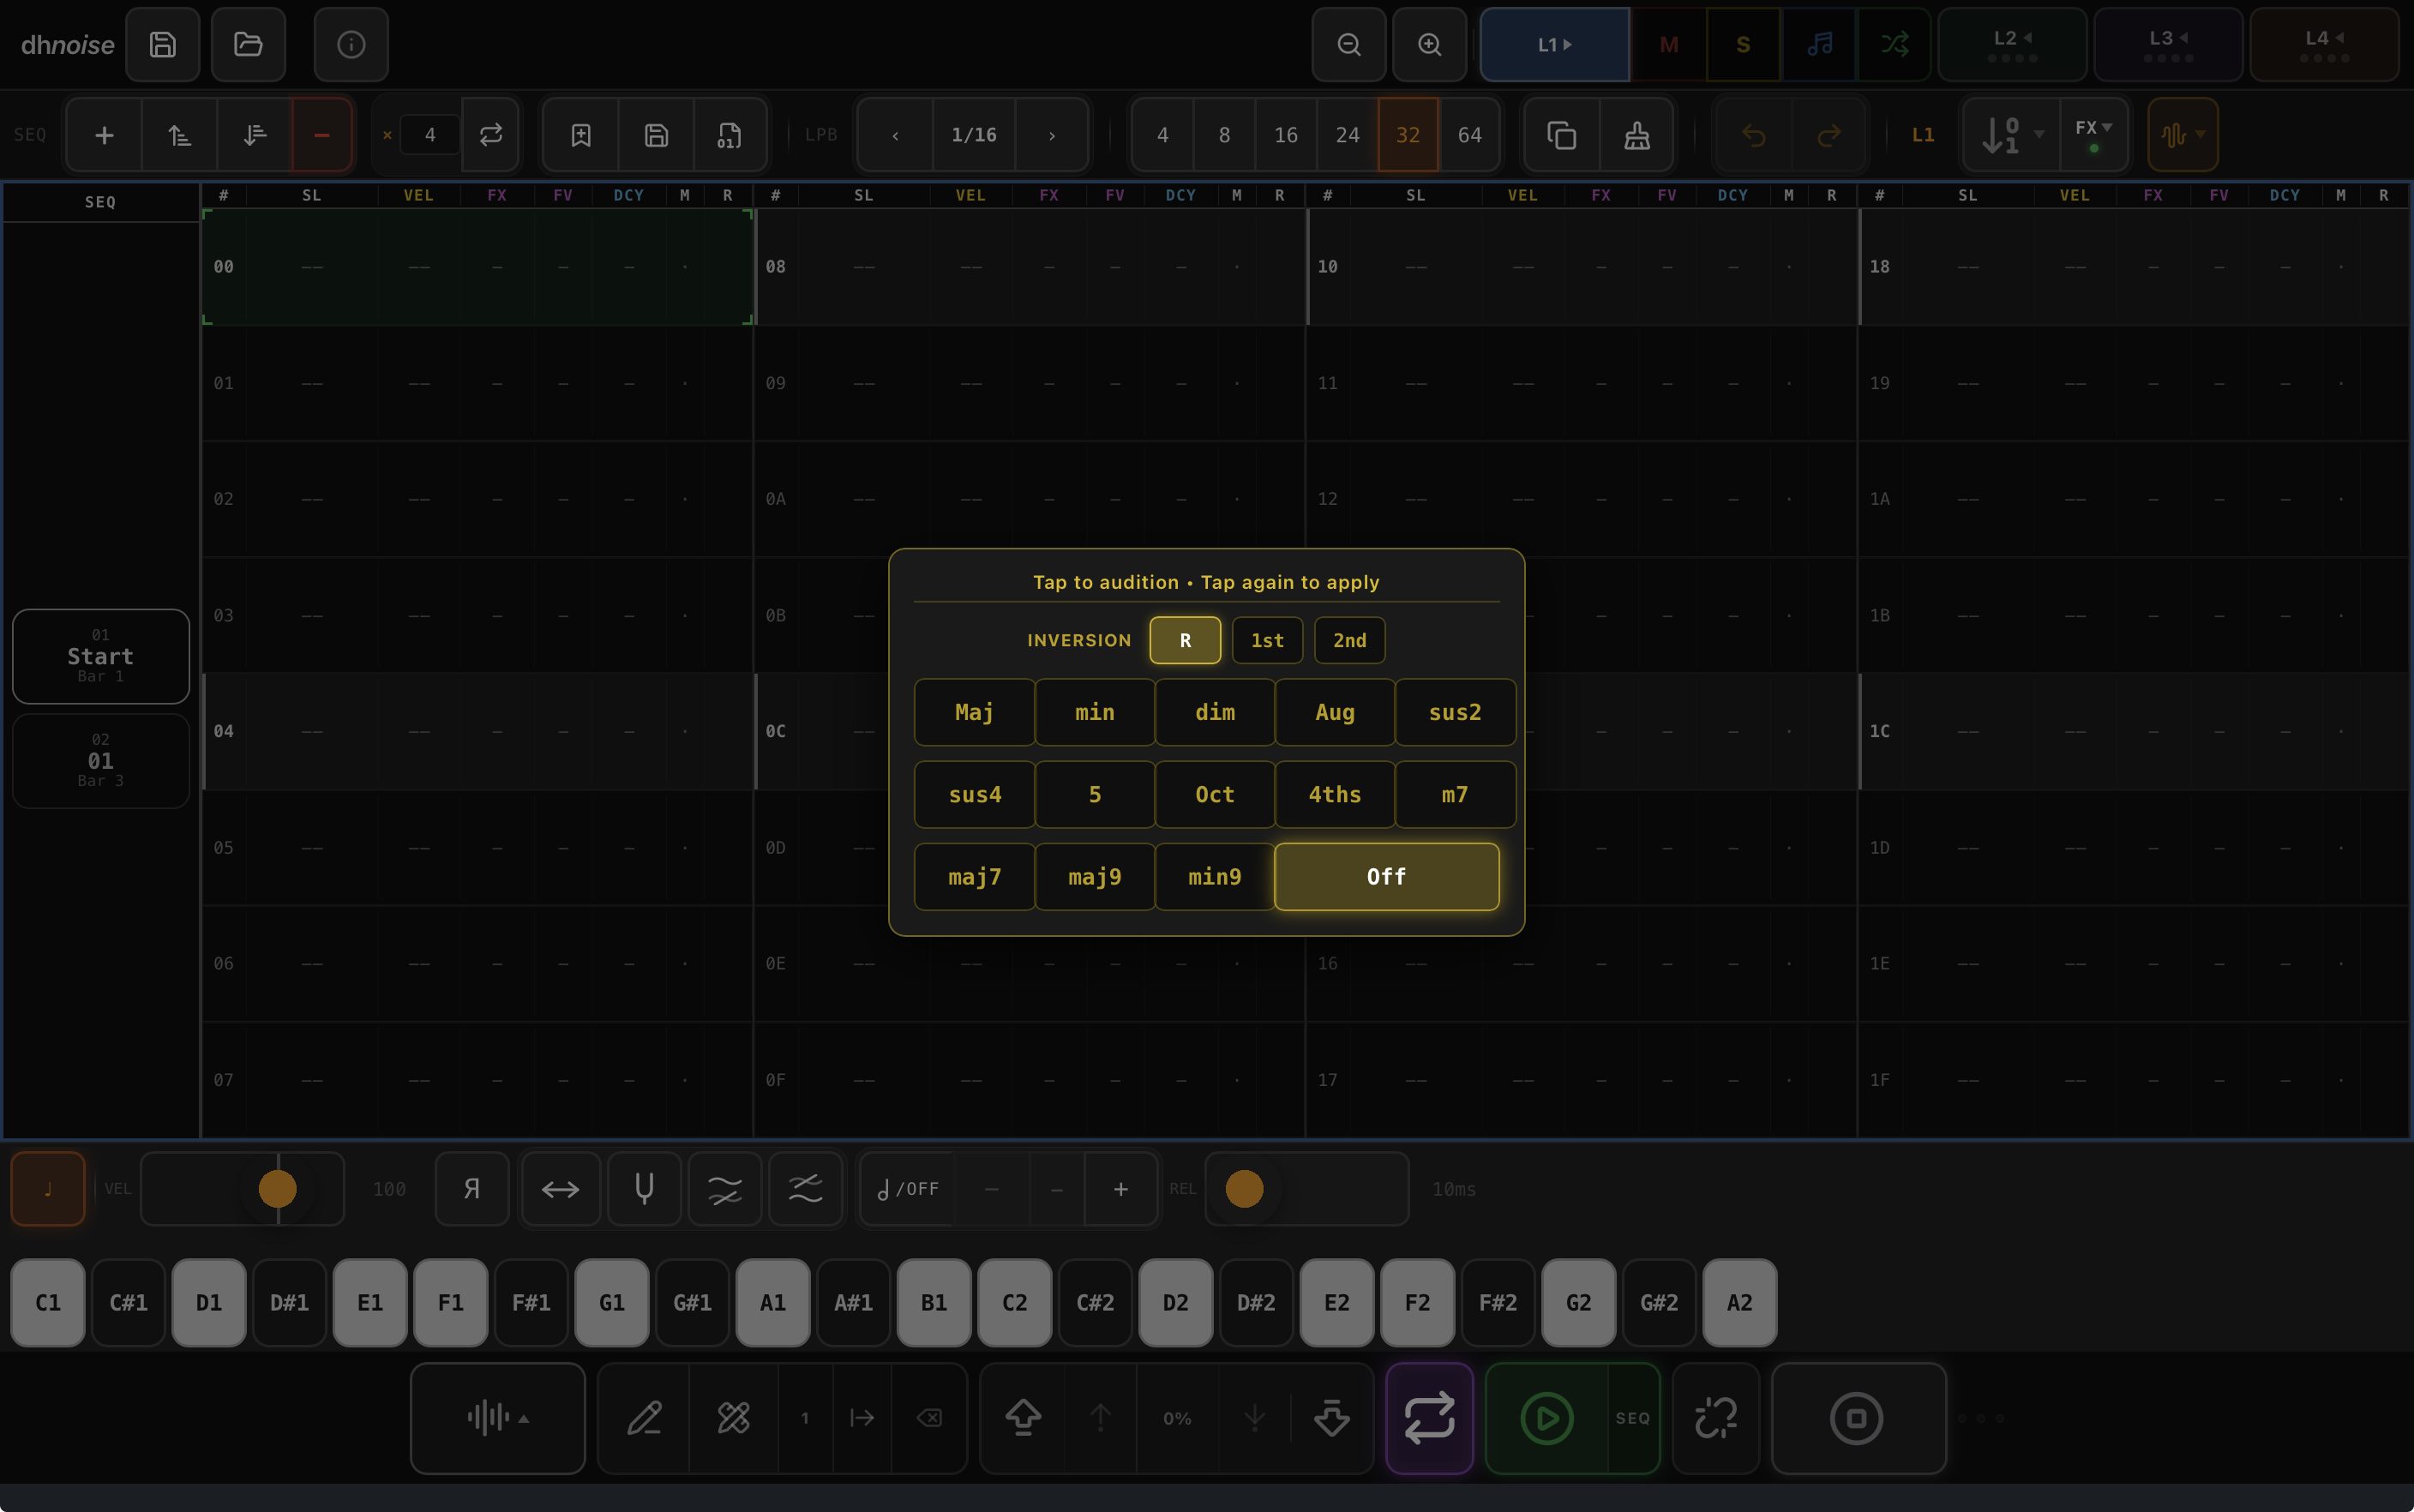
In chromatic mode (layer loaded but no slices committed), long-press a step's SL cell to open the chord picker. Choose from 13 chord types (Maj, min, dim, Aug, sus2, sus4, power, Oct, 4ths, m7, maj7, maj9, min9) and three inversions (root, 1st, 2nd). The chord fires as a stack of voices simultaneously.
MIDI Out
Each layer can output MIDI independently. Enable per-layer MIDI out from the MIDI pill in the layer row. Steps fire MIDI Note On/Off to downstream instruments — useful for driving external synths from the step sequencer. Each layer sends on its own MIDI channel.
Mixer View
Tap MIXER to open the combo view — all four layers displayed side by side in one scrollable grid. Edit any layer's steps directly by tapping in its column. The active layer is highlighted. Use the M (mute) and S (solo) buttons in the layer header row to control monitoring while you work.
Per-Layer FX
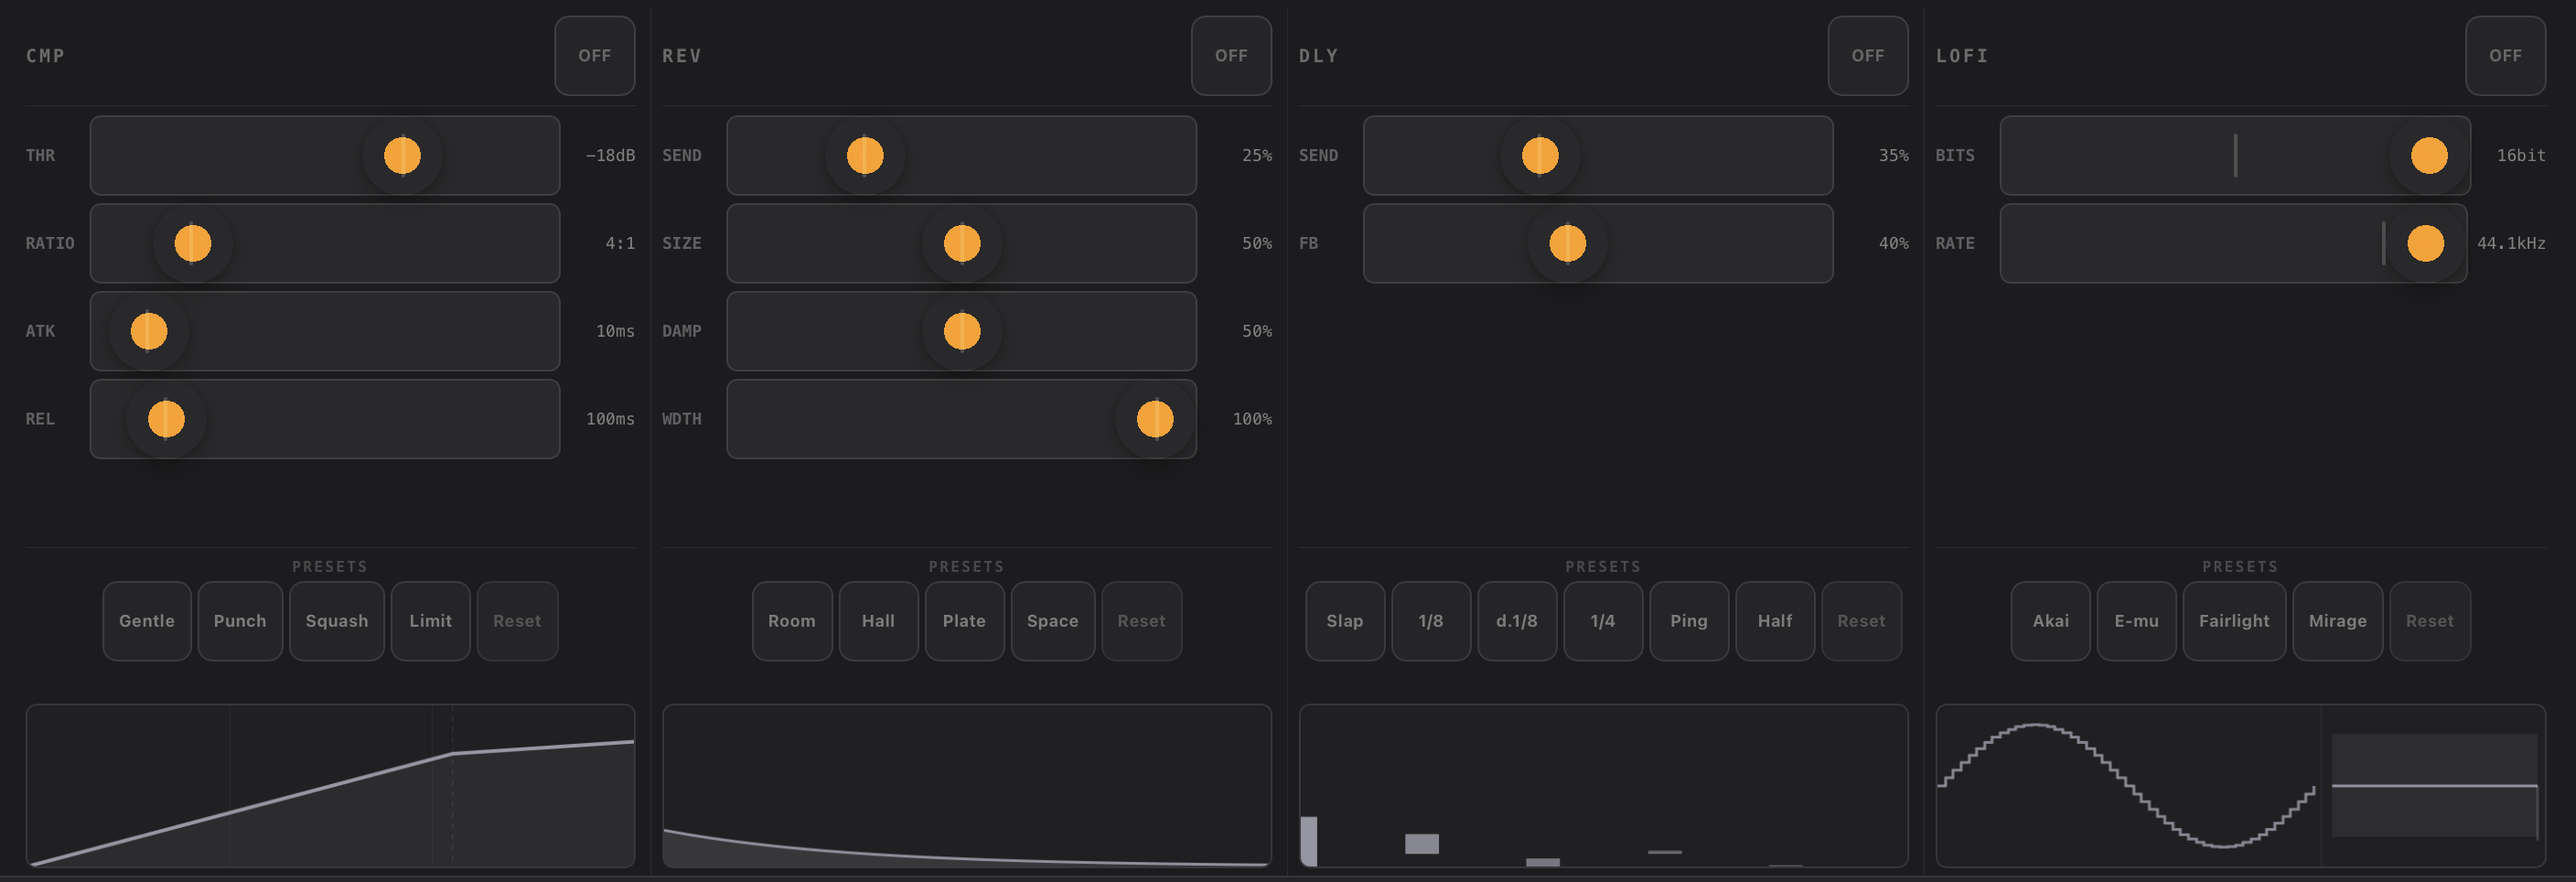
Each layer has its own FX chain: volume, compressor, reverb, delay, and lo-fi. Open via the FX button in the tracker nav bar. FX are applied at the layer mix stage — all four layers are processed independently before summing to the AUv3 output.
Playhead Behaviour
The white playhead bar shows the current play position. It parks at the stop row when playback stops. The green edit cursor shows where new notes will be written — it moves independently of the playhead and stays where you left it when stop is pressed.
Pattern Library
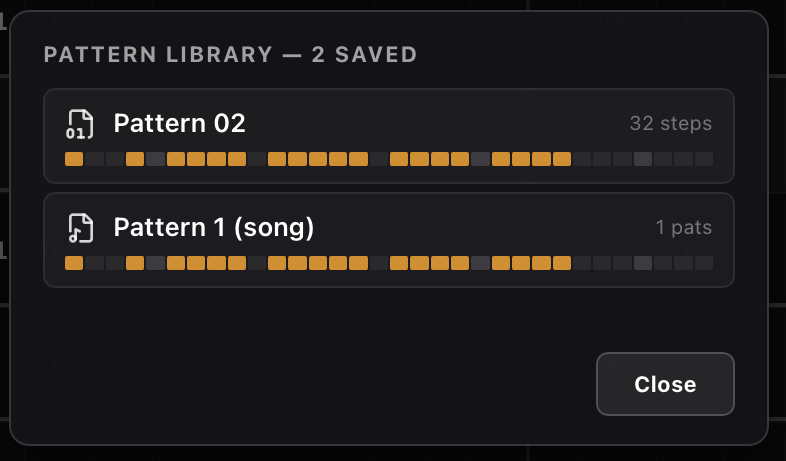
The pattern library lets you save and recall patterns and full song arrangements across sessions. Access it from the book icon in the TRK nav bar.
Saving
| Button | Saves |
|---|---|
| Save Pattern (bookmark+ icon) | Current active pattern (single phrase) for the current layer, including all step data, slice labels, and per-step FX |
| Save Song (floppy icon) | All patterns for all layers plus the full SEQ arrangement — a complete multi-layer song |
Recalling
Tap the library icon (file-digit icon) to open the library popup. Each entry shows its name, type (pattern or song), and a miniature step preview. Tap an entry to recall it. A slice-mapping modal then appears so you can remap slice indices from the saved session to the current sample's slices.
Slice Mapping
When a saved pattern is recalled into a session with a different sample (different number or order of slices), the slice indices may not match. The mapping modal lets you assign each saved slice label to a new slice index in the current sample. Tap Apply to rewrite all step SL values through the mapping. Tap Skip to use the saved indices unchanged. Tap Cancel Recall to undo the load entirely.
Deleting
Long-press any library entry and confirm to permanently delete it.
Session Save / Load
The Save and Load icons in the TRK nav bar export and import the full tracker state as a .dhnoise file. This includes all four layers' patterns, the SEQ arrangement, BPM, LPB, and per-layer settings. Use these for project backup or transferring sessions between devices.